Codeigniter User Registration & Login
10/04/2019 . 13 minutes, 6 seconds to read . Posted by Admin#Model,View,Controller #htmlemail #codeigniteremail #mysql #RoutinginCodeigniter #phpmyadmin #best-practices #WebDevelopment
Codeigniter User Registration & Login
In this article, we'll develop a user registration and login system using Codeigniter. Codeigniter is a lightweight, secure, fast and mostly used PHP framework. To get started we need to download this from its official site.
Click here to download the project and extract that in your server directory and name it as user-auth. Now run the project in the browser, a welcome page should be visible.
Registration
We'll first create a registration feature. For this, we need to perform the following steps.
- Create Register Controller and index action
- Create register View and load that with the index action
- Create a database called cr_mydb and create a table called users
- Create a UserModel
- Create insert function in UserModel to insert a user in the table
- Save user
Create Register Controller and index action
Codeigniter follows MVC architecture, which stands for Model, View, Controller. We'll learn about Model and View in upcoming steps. In this step, we'll focus on the Controller. A controller is the most important part of MVC architecture, it controls the flow of the application.
When we call any URL, CI(Codeigniter) loads specific controller and it's action depending on the URL. Then the controller action perform different functions for example
- Loading Views to display the user interface
- Calling Model functions for database work
- Getting data from the model and passing to Views for display
So in our app, we need a controller for registration activities. We can create it as follows.
<?php
class Register extends CI_Controller{
    function __construct(){
        parent::__construct();
    }

    public function index()
    {
        echo "Hello World";
    }
}
Now if you enter following URL in the browser you'll see Hello World printed on the screen.
http://localhost/user-auth/index.php/registerif you want to remove index.php from the URL you can create a .htaccess file in the root directory of the project and past the following code in that file.
RewriteEngine on
RewriteCond $1 !^(index.php|resources|robots.txt)
RewriteCond %{REQUEST_FILENAME} !-f
RewriteCond %{REQUEST_FILENAME} !-d
RewriteRule ^(.*)$ index.php/$1 [L,QSA]
Now the following URL will also work.
http://localhost/user-auth/registerCreate register View and load that with the index action
In views folder, create a folder named as register and create the index.php file for view in that folder. You can paste the following code in that file.
<!DOCTYPE html>
<html>
<head>
    <meta charset="utf-8">
    <meta http-equiv="X-UA-Compatible" content="IE=edge">
    <title>User Registration</title>
    <meta name="viewport" content="width=device-width, initial-scale=1">
    <link href="//maxcdn.bootstrapcdn.com/bootstrap/4.0.0/css/bootstrap.min.css" rel="stylesheet" id="bootstrap-css">
</head>

<body>
    <div class="container pt-4">
        <div class="row justify-content-center">
            <div class="col-md-6">
                <div class="card">
                    <header class="card-header">
                        <h4 class="card-title mt-2">User Registration</h4>
                    </header>
                    <article class="card-body">
                        <form action='<?=base_url("register/save")?>' method="post">
                            <div class="form-row">
                                <div class="col form-group">
                                    <label>First name </label>
                                    <input type="text" name="first_name" value="<?php echo set_value('first_name'); ?>" class="form-control" placeholder="">
                                    <span class="text-danger"><?php echo form_error('first_name'); ?></span>
                                </div>
                                <div class="col form-group">
                                    <label>Last name</label>
                                    <input type="text" name="last_name" value="<?php echo set_value('last_name'); ?>" class="form-control" placeholder=" ">
                                    <span class="text-danger"><?php echo form_error('last_name'); ?></span>
                                </div>
                            </div>
                            <div class="form-group">
                                <label>Email address</label>
                                <input type="email" name="email" value="<?php echo set_value('email'); ?>" class="form-control" placeholder="">
                                <span class="text-danger"><?php echo form_error('email'); ?></span>
                            </div>

                            <div class="form-group">
                                <label>Password</label>
                                <input class="form-control" type="password" name="password" value="<?php echo set_value('password'); ?>">
                                <span class="text-danger"><?php echo form_error('password'); ?></span>
                            </div>

                            <div class="form-group">
                                <label>Confirm password</label>
                                <input class="form-control" type="password" name="confirm_password" value="<?php echo set_value('confirm_password'); ?>">
                                <span class="text-danger"><?php echo form_error('confirm_password'); ?></span>
                            </div>
                            <div class="form-group">
                                <button type="submit" class="btn btn-success btn-block"> Register </button>
                            </div>
                        </form>
                    </article>
                </div>
            </div>
        </div>
    </div>
</body>

</html>
You can see, it uses some PHP functions, let's discuss them one by one
base_url()
base_url contains the base URL of the project in our case it will be http://localhost/user-auth. To use this function we need to load URL helper in autoload.php as follows:
$autoload['helper'] = array('url');form_error()
The form_error function is used in form validation to return the validation error for the given form element. To use this function we need to load the Form Validation Library in autoload.php as follows:
$autoload['libraries'] = array("form_validation");set_value()
set_value() is used to set values of form input. To use this function we need to load Form helper in autoload.php as follows:
$autoload['helper'] = array('url','form');The view is completed and now we need to load it in controller action so the user can see this. Here is the updated code of Register Controller
<?php
class Register extends CI_Controller{
    function __construct(){
        parent::__construct();
    }

    public function index()
    {
        $this->load->view("register/index");
    }
}
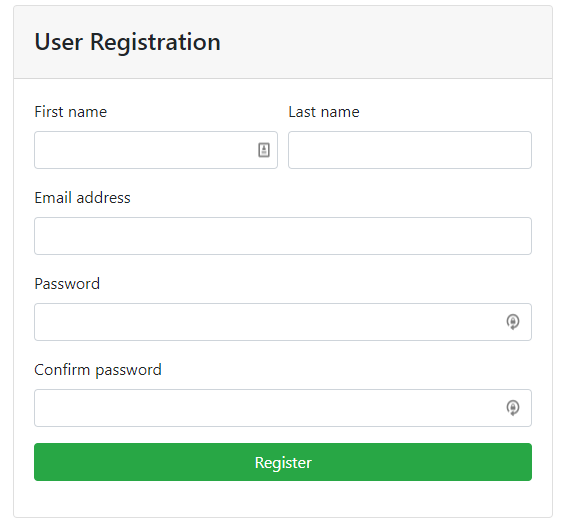
Now if you open the register page, it will look like this.

Create a database called cr_mydb and create a table called users
To interact with the MySQL database, we're using PHPMyAdmin. You can create a database using a graphical user interface and similarly a users table. Query for users table will look like this.
CREATE TABLE `users` (
  `id` int(11) NOT NULL,
  `last_name` varchar(100) NOT NULL,
  `first_name` varchar(100) NOT NULL,
  `email` varchar(100) NOT NULL,
  `password` varchar(100) NOT NULL
)
Database Configuration in Codeigniter:
To connect our app with a database, we need to load the database library in autoloads as follows
$autoload['libraries'] = array("form_validation","database");Now, we need to enter database information in database.php, while will used by the app to connect with the database.
$db['default'] = array(
	'dsn'	=> '',
	'hostname' => 'localhost',
	'username' => 'root',
	'password' => '',
	'database' => 'cr_mydb',
	'dbdriver' => 'mysqli',
	'dbprefix' => '',
	'pconnect' => FALSE,
	'db_debug' => (ENVIRONMENT !== 'production'),
	'cache_on' => FALSE,
	'cachedir' => '',
	'char_set' => 'utf8',
	'dbcollat' => 'utf8_general_ci',
	'swap_pre' => '',
	'encrypt' => FALSE,
	'compress' => FALSE,
	'stricton' => FALSE,
	'failover' => array(),
	'save_queries' => TRUE
);
Create a UserModel
Model is responsible for all database related work in MVC. We'll create UserModel for insertion of the user in the database. Create a UserModel.php in the models' folder and paste the following code in that file.
<?php
class UserModel extends CI_Model{
    function __construct(){
        parent::__construct();
    }
}
Create insert function in UserModel to insert a user in the table
We've created a function that will be used to insert a new user. UserModel will finally look like this.
<?php
class UserModel extends CI_Model{
    function __construct(){
        parent::__construct();
    }

    public function insert($user)
    {
        $this->db->insert("users",$user);
    }
}
Save user
Now, we need to create a new action where we can submit our form and process it. I've created that action named as save, which will validate and insert user as follows.
<?php
class Register extends CI_Controller{
    function __construct(){
        parent::__construct();
        $this->load->model("UserModel");
    }

    public function index()
    {
        $this->load->view("register/index");
    }

    public function save()
    {
        $this->form_validation->set_rules('first_name', 'First Name', 'required');
        $this->form_validation->set_rules('last_name', 'Last Name', 'required');
        $this->form_validation->set_rules('email', 'Email Address', 'trim|required|valid_email');
        $this->form_validation->set_rules('password', 'Password', 'trim|required|min_length[8]');
        $this->form_validation->set_rules('confirm_password', 'Confirm Password', 'trim|required|matches[password]');

        $post = $this->input->post();
        if ($this->form_validation->run() == true){
            $user = array(
                'first_name' => $post["first_name"],
                'last_name' => $post["last_name"],
                'email' => $post["email"],
                'password' => $post["password"],
            );
            $this->UserModel->insert($user);
            echo "save in session and redirect to dashboard";
        }else{
            $this->load->view("register/index");
        }
    }
}
Let's discuss each step in detail.
Setting Rules to Validate form
set_rules() is used to apply different rules on form elements. We've applied the following rules.
- first_name is required
- last_name is required
- email field is required and must be a valid email address
- the password field is required and must have 8 characters minimum
- confirm password field is required and must match with the password field value
Validation and Creating the user
After running if the submitted form is valid, we create a new array for a user and pass that to insert function to create a user. After the creation of the user, you can create a session and redirect the user to the dashboard.
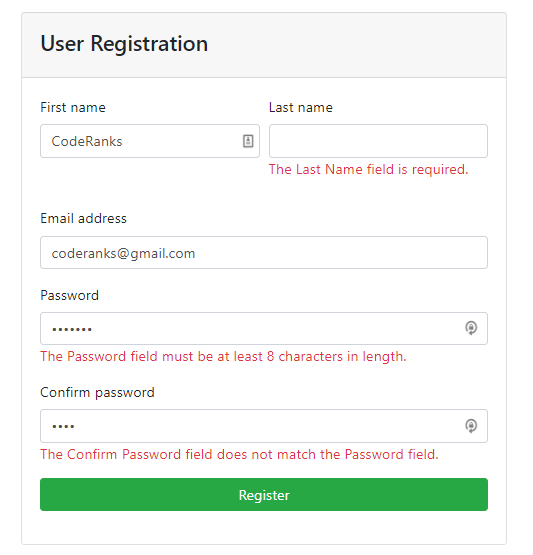
If the form is not valid then, we need to load the same view and there will be errors visible as follows.

User Login
User registration is completed, now we need to enable registered users to log in with our system. Here are the steps for login.
- New Login controller and action
- View to display Form to user
- Creating a new function in UserModel for login verification
- Validating form and user details.
New Login controller and action
To start with login, we need to create a Login controller and an action that will render a login form where the user can enter his credentials. Login controller will look like this.
<?php
class Login extends CI_Controller{
    function __construct(){
        parent::__construct();
    }

    public function index()
    {
        echo "display login form";
    }
}
The URL for login will be similar to this.
http://localhost/user-auth/loginView to display Form to user
In this step, we're going to create a view for login. For this create a new folder in Views and an index.php file in that folder. Paste the following code in that file.
<!DOCTYPE html>
<html>
<head>
    <meta charset="utf-8">
    <meta http-equiv="X-UA-Compatible" content="IE=edge">
    <title>User Login</title>
    <meta name="viewport" content="width=device-width, initial-scale=1">
    <link href="//maxcdn.bootstrapcdn.com/bootstrap/4.0.0/css/bootstrap.min.css" rel="stylesheet" id="bootstrap-css">
</head>

<body>
    <div class="container pt-4">
        <div class="row justify-content-center">
            <div class="col-md-6">
                <div class="card">
                    <header class="card-header">
                        <h4 class="card-title mt-2">User Login</h4>
                    </header>
                    <article class="card-body">
                        <?php
                            if( $this->session->flashdata('error') != ""){
                                ?>
                                     <div class="alert alert-danger" role="alert">
                                        <?= $this->session->flashdata('error'); ?>
                                    </div>
                                <?php
                            }
                        ?>

                        <form action='<?=base_url("login/process")?>' method="post">
                            <div class="form-group">
                                <label>Email address</label>
                                <input type="email" name="email" value="<?php echo set_value('email'); ?>" class="form-control" placeholder="">
                                <span class="text-danger"><?php echo form_error('email'); ?></span>
                            </div>

                            <div class="form-group">
                                <label>Password</label>
                                <input class="form-control" type="password" name="password" value="<?php echo set_value('password'); ?>">
                                <span class="text-danger"><?php echo form_error('password'); ?></span>
                            </div>
                            <div class="form-group">
                                <button type="submit" class="btn btn-success btn-block"> Login </button>
                            </div>
                        </form>
                    </article>
                </div>
            </div>
        </div>
    </div>
</body>

</html>
The above view user almost the same functions and used in register view but in this view, we've used flash data.
Flash Data
In Codeigniter, Flash data is only available for the next request and after that, it will automatically be destroyed. We've used this for displaying an error message to the user if username or password doesn't match with the database. To use flash data, we need to load the session library as follows.
$autoload['libraries'] = array("form_validation","database","session");Now, we need to load this view in the controller as follows.
<?php
class Login extends CI_Controller{
    function __construct(){
        parent::__construct();
        $this->load->model("UserModel");
    }

    public function index()
    {
        $this->load->view("login/index");
    }
}
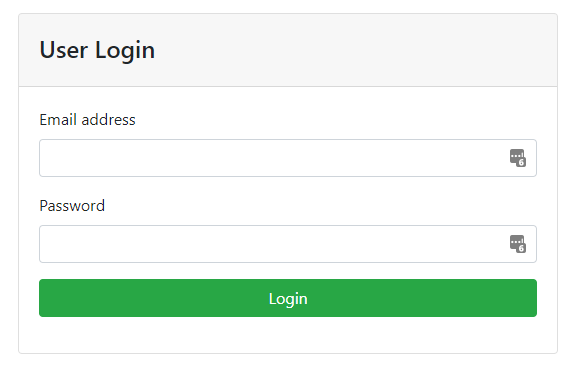
If you open login URL in the browser, the form will look like this now.

Creating a new function in UserModel for login verification
From the form, we'll get username and password, now we need to create a function that will check if that username and password exist in our database. To do that we need to create a new function in UserModel for database side work for login. UserModel will look like this now.
<?php
class UserModel extends CI_Model{
    function __construct(){
        parent::__construct();
    }

    public function insert($user)
    {
        $this->db->insert("users",$user);
    }

    public function checkUser($email,$password)
    {
        $user = $this->db->like("email",$email)
                    ->like("password",$password)
                    ->get("users")
                    ->row();
        return $user;
    }
}
Now we can use this checkUser function in our controller to check user details.
Validating form and user details
This is the last and most important point that will connect the view to model, in this step we need to create a new action in Login controller that will receive data from login form, validate it and use the model to check login if the user exists.
Login controller will look like this now.
<?php
class Login extends CI_Controller{
    function __construct(){
        parent::__construct();
        $this->load->model("UserModel");
    }

    public function index()
    {
        $this->load->view("login/index");
    }

    public function process()
    {
        $this->form_validation->set_rules('email', 'Email Address', 'trim|required|valid_email');
        $this->form_validation->set_rules('password', 'Password', 'trim|required|min_length[8]');

        $post = $this->input->post();
        if ($this->form_validation->run() == true){
            $email = $post["email"];
            $password = $post["password"];
            $user = $this->UserModel->checkUser($email,$password);
            if($user){
                echo "save in session and redirect to dashboard";
            }else{
                $this->session->set_flashdata('error','User not found');
                $this->load->view("login/index");
            }
        }else{
            $this->load->view("login/index");
        }
    }
}
The process function is similar to the save function of Register, so I think things will make sense for you. Here are the steps we've performed in this function.
- Form Validation
- if valid, we check user in the database
- if the user exists, we can create a session and redirect to dashboard
- if not exist, we'll add an error in flash data, that will be visible in the view
- if the form is not valid, errors will be visible on the form.
That's all for this article, hopefully, you enjoyed learning.
Thanks for reading.
